User Interface Best Practices: The MVVM Design Pattern
Last updated on 2026-02-06 | Edit this page
Overview
Questions
- What is the Model-View-ViewModel (MVVM) design pattern, and why is it useful for UI development?
- What are the roles and responsibilities of the Model, View, and ViewModel in the MVVM pattern?
- How does data binding work in MVVM, and why is it important?
- How does the
nova-mvvmlibrary simplify the implementation of the MVVM pattern in NOVA applications? - What is Pydantic, and how can it be used for data modeling and validation in the context of MVVM?
Objectives
- Define the Model-View-ViewModel (MVVM) design pattern and its benefits.
- Explain the responsibilities of each component in the MVVM pattern (Model, View, ViewModel).
- Describe the role of data binding in MVVM and how it enables reactive UIs.
- Explain the purpose of the
nova-mvvmlibrary and its key components (BindingInterface,TrameBinding,Communicator,new_bind). - Introduce Pydantic for data modeling and validation within the MVVM pattern.
- Understand how to implement MVVM using
nova-mvvmand Pydantic in a NOVA application.
User Interface Best Practices: The MVVM Design Pattern
In this section, we will introduce the Model-View-ViewModel (MVVM) design pattern, a powerful architectural approach for structuring applications, particularly those with user interfaces. We'll explore the core principles of MVVM, the roles of each component, and how the NOVA framework simplifies its implementation, making your code more organized, testable, and maintainable.
What is a Design Pattern?
Before diving into MVVM, it's helpful to understand what a design pattern is in software development. A design pattern is a reusable solution to a commonly occurring problem in software design. It's not a code snippet you can copy and paste, but rather a template or blueprint for how to structure your code to achieve a specific goal (e.g., separation of concerns, code reusability, testability).
The Model-View-ViewModel (MVVM) Pattern
MVVM is an architectural design pattern specifically designed for applications with user interfaces (UIs). It aims to separate the UI (the View) from the underlying data and logic (the Model) by introducing an intermediary component called the ViewModel. This separation makes the application more maintainable, testable, and easier to evolve.
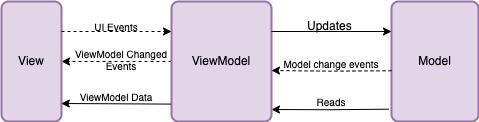
The MVVM pattern consists of three core components:
-
Model: The Model represents the data and
the business logic of the application. It's responsible for:
- Data storage (e.g., reading from and writing to a database, a file, or an API).
- Data validation (ensuring the data is in a valid state).
- Business rules (the logic that governs how the data is manipulated and used).
The Model is agnostic to the UI. It doesn't know anything about how the data will be displayed or how the user will interact with it. It simply provides the data and the means to manipulate it.
-
View: The View is the user interface (UI)
of the application. It's responsible for:
- Displaying data to the user.
- Capturing user input (e.g., button clicks, text entered in a field, selections from a dropdown).
- Presenting the application's visual appearance.
The View is passive. It doesn't contain any business logic or data manipulation code. It simply displays the data provided to it and relays user actions to the ViewModel.
In our NOVA tutorial, the View will be built using Trame and Vuetify
components, leveraging the styling and structure provided by
nova-trame.
-
ViewModel: The ViewModel acts as an
intermediary between the Model and the View. It's responsible
for:
- Preparing data from the Model for display in the View. This might involve formatting the data, combining data from multiple sources, or creating derived data.
- Handling user actions from the View. This might involve validating user input, updating the Model, or triggering other actions in the application.
- Exposing data and commands to the View through data binding.
The ViewModel knows about the View and the data that the View needs, but it doesn't know about the specific UI components that are used to display the data. It also orchestrates the interaction between the View and the Model.
The ViewModel is where we'll use nova-mvvm to create
bindings between the ViewModel and the View, enabling the reactive
updates.
Why Use MVVM?
The MVVM pattern provides several benefits:
- Separation of Concerns: MVVM clearly separates the UI (View) from the application logic (Model) and the presentation logic (ViewModel). This makes the code more organized and easier to understand.
- Testability: Because the ViewModel is independent of the View, it can be easily unit-tested. You can test the presentation logic without needing to create a UI.
- Maintainability: Changes to the UI are less likely to affect the underlying application logic, and vice versa. This makes the application easier to maintain and evolve over time.
- Reusability: The ViewModel can be reused with different Views, allowing you to create different UIs for the same underlying data and logic.
- Team Collaboration: MVVM facilitates collaboration between developers and UI designers. Developers can focus on the Model and ViewModel, while designers can focus on the View, without interfering with each other's work.
Data Binding: The Heart of MVVM
Data binding is a mechanism that allows the View and the ViewModel to automatically synchronize their data. When the data in the ViewModel changes, the View is automatically updated to reflect the changes. Conversely, when the user interacts with the View (e.g., by entering text in a field), the data in the ViewModel is automatically updated.
This data binding is what makes MVVM so powerful and allows for reactive UIs. Instead of manually writing code to update the UI every time the data changes, you simply bind the UI components to the data in the ViewModel, and the updates happen automatically.
How NOVA Simplifies MVVM
The NOVA framework provides libraries and tools that simplify the implementation of the MVVM pattern:
-
nova-mvvm: This library provides a set of classes and functions that make it easier to create bindings between the ViewModel and the View. It handles the low-level details of data synchronization, allowing you to focus on the application logic. -
nova-trame: Provides a set of pre-built components and layouts that are designed to work seamlessly withnova-mvvm. This simplifies the creation of the View and ensures a consistent look and feel across NOVA applications. - Pydantic: While not strictly part of the MVVM pattern, Pydantic helps define the structure of your Model and ViewModel, making it easier to validate data and ensure data integrity.
Introduction to Pydantic for Data Modeling
Pydantic is a Python library that we will use to define data models and enforce data validation in our application. It uses Python type hints to define the structure of your data and automatically validates data against these types at runtime.
Benefits of Pydantic:
- Data Validation: Automatically validates data types and constraints, ensuring data integrity.
- Clear Data Structures: Defines data models in a clear and readable way using Python type hints.
- Serialization and Deserialization: Easily serializes data to and from standard formats like JSON.
- Improved Code Readability: Makes code easier to understand and maintain by explicitly defining data models.
Data Binding with NOVA
The nova-mvvm library greatly
simplifies the data synchronization between the components of an MVVM
application and provides support for user interfaces utilizing the
Trame, PyQt, and Panel graphical frameworks. The library provides
several predefined classes including TrameBinding, PyQtBinding, and
PanelBinding to connect UI components to model variables.
The rest of this tutorial focuses on building Trame GUI applications
using nova-trame and nova-mvvm. Therefore, we
will focus on the TrameBinding class, but all three function
similarly.
How to use TrameBinding
The initial step is to create a BindingInterface. A BindingInterface serves as the foundational layer for how connections are made between variables in the ViewModel and UI components in the View. Once a Trame application has started, the BindingInterface can be created in the View with:
After a BindingInterface has been created, variables must be added to
the interface via the interface's new_bind method. The
new_bind method expects a variable that will be linked to a
UI component, and an optional callback method. The callback method is
useful if there are actions to be performed after updates to the UI. In
the code snippet below, wemodel variable to the
binding interface. This new_bind method returns a
Communicator. The Communicator is an object
which manages the binding and will be used to propgate updates.
PYTHON
# Adding a binding to the Binding Interface, returns a Communicator
self.config_bind = bindingInterface.new_bind(self.model)
The self.config_bind object is a
Communicator and is used to update the View. When the
ViewModel needs to tell the View to perform an Update, it calls the
update_in_view method of the Communicator. For
the self.config_bind object, the ViewModel would make a
call like below. It is common practice for the ViewModel to have a
method such as update_view, where ViewModel would update many objects.
However, there are also times when it is appropriate to only update a
singular object.
PYTHON
# Updating the UI connected to a binding.
def update_view(self) -> None:
    self.config_bind.update_in_view(self.model)
We've seen how to create a BindingInterface, add a new binding, and
how to perform updates. We also need to connect our View components to
the Communicators. The Communicator class has a connect
method. This method accepts a callable object or a string. If you pass a
callable object, such as a method, that object will be called whenever
the binding's update_in_view method is called. An example of this can be
seen when working with Plotly in Episode 7. In the example below, we
connect to the config_bind Communicator object that was
created in our ViewModel. When a string is passed to the connect method,
that string will be used as the unique name of our connector. In this
example, we pass in the string config but you are free to
use any string that is not already in use as a connector.
Finally, we connect a UI component to the connector object. The
template application uses the nova-trame library
which we'll work with in the next episode. For now, just note that
InputField is a UI components that is being connected to the binding in
our ViewModel
Project Structure
The template creates a well-organized project structure following
best practices, including the Model-View-ViewModel (MVVM) design
pattern. This structure promotes code maintainability, testability, and
separation of concerns. Here
nova_tutorial/: The root directory of your project. This is the top-level directory containing all project files and subdirectories.nova_tutorial/src/: This directory contains all the source code for your application. The separation intosrchelps distinguish your application code from configuration files, tests, and other project-related files that reside in the root.-
nova_tutorial/src/nova_tutorial/: This is the main Python package for your application. Its name (nova_tutorialin this case) is used when importing modules within your project. Inside this directory, youll find the core application logic, organized according to the MVVM pattern: -
nova_tutorial/src/nova_tutorial/app/: This directory contains the main application logic, further subdivided to reflect the MVVM structure.nova_tutorial/src/nova_tutorial/app/models/: (Model) This is where you define your data models and business logic. These classes represent the data your application works with and the rules for manipulating that data.nova_tutorial/src/nova_tutorial/app/view_models/: (ViewModel) This directory holds the ViewModels. These classes act as intermediaries between the Models and the Views. They prepare data for display and handle user interactions from the View.nova_tutorial/src/nova_tutorial/app/views/: (View) This directory contains the user interface (UI) components. These are built using Trame and Vuetify (vianova-trame). They are responsible for displaying data and capturing user input.nova_tutorial/src/nova_tutorial/app/main.py: The entry point for your NOVA application. This file initializes and starts the Trame server and theMainAppview.
-
nova_tutorial/tests/: Contains unit tests for your application. A well-structured project should include tests to ensure code quality and prevent regressions. The tests are typically organized to mirror the structure of your application code (e.g., tests for models, view models, and potentially UI components).nova_tutorial/README.md: A Markdown file providing a description of your project, instructions for setup and usage, and any other relevant information.pyproject.toml: A configuration file for Pixi, the dependency management and packaging tool used by NOVA. It specifies project dependencies, build settings, and other metadata.
Implementing MVVM with nova-mvvm and Pydantic
Let
1. Initial Setup and ViewModel Basics
First, letmain.py and set up the basic
structure of our UI and ViewModel interaction. We
main.py- Simplifying the Application Entry Point (src/nova_tutorial/app/main.py) (Modify):
Wemain(). The application will now solely focus on launching
the NOVA app.
PYTHON
import sys

def main() -> None:
   kwargs = {}
   from .views.main import MainApp

   app = MainApp()
   for arg in sys.argv[2:]:
       try:
           key, value = arg.split("=")
           kwargs[key] = int(value)
       except Exception:
           pass
app.server.start(**kwargs)- Adding a Placeholder Method to the ViewModel
(
src/nova_tutorial/app/view_models/main_view_model.py) (Modify):
Add a run_fractal method to the
MainViewModel. For now, it just prints a message to the
console. This confirms that the button click is connected to the
ViewModel.
- Creating a FractalTab
(
src/nova_tutorial/app/views/fractal_tab.py) (Create):
This is the UI for our Fractal interaction. It includes a button that
calls the run_fractal method in the ViewModel. We don
PYTHON
from trame.widgets import vuetify3 as vuetify

from nova.trame.view.components import InputField
from nova_tutorial.app.view_models.main_view_model import MainViewModel

class FractalTab:
    def __init__(self, view_model: MainViewModel) -> None:
        self.view_model = view_model
        self.create_ui()

    def create_ui(self) -> None:
        vuetify.VBtn(
            "Run Fractal",
            click=self.view_model.run_fractal
)- Modify the tab panel
(
src/nova_tutorial/app/views/tabs_panel.py) (Modify):
Add the
PYTHON
    with client.DeepReactive("view_state"):
        with vuetify.VTabs(v_model="view_state.active_tab", classes="pl-5"):
            vuetify.VTab("Fractal", value=0)  # Add Fractal Tab
            vuetify.VTab("Sample Tab 1", value=1)
vuetify.VTab("Sample Tab 2", value=2)- Modify the tab panel content
(
src/nova_tutorial/app/views/tab_content_panel.py) (Modify):
Display the FractalTab content when the
PYTHON
from .fractal_tab import FractalTab  # Import the FractalTab

    def create_ui(self) -> None:
        with VBoxLayout(v_show="view_state.active_tab == 0", stretch=True):
            FractalTab(self.view_model)  # Add FractalTab
        with VBoxLayout(v_show="view_state.active_tab == 1", stretch=True):
            SampleTab1()
        with VBoxLayout(v_show="view_state.active_tab == 2", stretch=True):
            SampleTab2()
Demonstration (Initial UI and ViewModel Connection):
Run the application: pixi run app
You should see a new run_fractal method in the
ViewModel, even though the method doesn
2. Fractal Model and Pydantic Integration
Now, letFractal model using Pydantic
and integrate it into our MainModel.
Updating our Fractal Class for pydantaic and MVVM (
src/nova_tutorial/app/models/fractal.py) (Modify)Adding new imports: Add imports for Pydantic and base64 handling.
PYTHON
import os
from base64 import b64encode
from typing import Literal

from pydantic import BaseModel, Field
from nova.galaxy import Connection, Parameters, Tool-
Update class variables: Use Pydantic
s Fieldfor type hinting and validation. Add theimage_datafield.
PYTHON
class FractalData(BaseModel):
    fractal_type: Literal["mandelbrot", "julia", "random", "markus"] = Field(default="mandelbrot")
    galaxy_url: str = Field(default=os.getenv("GALAXY_URL", ""), description="NDIP Galaxy URL")
    galaxy_key: str = Field(default=os.getenv("GALAXY_API_KEY", ""), description="NDIP Galaxy API Key")
    image_data: str = Field(default="", description="Base64 encoded PNG")

class Fractal:
    # ...
    def set_fractal_type(self, fractal_type: str):
        self.fractal_type = fractal_type
# ...- Decode the data: Update how the image is decoded.
PYTHON
            output.get_dataset("output").download("image.png")

            with open("image.png", "rb") as image_file:
self.image_data = f"data:image/png;base64,{b64encode(image_file.read()).decode()}"- Updating our MainModel Class to add the new Fractal Class
(
src/nova_tutorial/app/models/main_model.py) (Modify):
Import and include the Fractal model as a field in the
MainModel.
PYTHON
from pydantic import BaseModel, Field
from .fractal import Fractal  # Import Fractal

class Config(BaseModel):
    # ... (previous MainModel) ...
    password: str = Field(default="test_password", title="User Password")


class MainModel:
    def __init__(self) -> None:
        self.config = Config()
self.fractal = Fractal()-
Add Full Functionality to the View Model
(
src/nova_tutorial/app/view_models/main_view_model.py) (Modify) Update the code in the run_fractal method.
PYTHON
    def __init__(self) -> None:
        # ...
        self.config_bind = binding.new_bind(self.model.config, callback_after_update=self.change_callback)
        self.fractal_bind = binding.new_bind(self.model.fractal.data, callback_after_update=self.change_callback)
        # ...

    def run_fractal(self) -> None:
        self.model.fractal.run_fractal_tool()
        self.update_view()

    def update_view(self) -> None:
        self.config_bind.update_in_view(self.model.config)
self.fractal_bind.update_in_view(self.model.fractal.data)- Connect the UI elements in FractalTab
(
src/nova_tutorial/app/views/fractal_tab.py) (Modify):
Update the create UI section to use InputField and the image.
PYTHON
from nova.trame.view.components import InputField

    # ...(rest of file)...
    def __init__(self) -> None:
        self.view_model = view_model
        self.view_model.fractal_bind.connect("fractal")
        self.create_ui()

    def create_ui(self) -> None:
        with VBoxLayout():
            InputField(v_model="fractal.fractal_type")
        with VBoxLayout(classes="mb-2", halign="left"):
            vuetify.VBtn("Run Fractal", click=self.view_model.run_fractal)
        with VBoxLayout(stretch=True):
            vuetify.VImg(src=("fractal.image_data",), classes="h-100 w-100")
Final Demonstration (Full Application):
Run the application: pixi run app
Now, when you click fractal_type using the input field. This
demonstrates the complete MVVM flow, with data binding, Pydantic
validation, and the interaction between the View, ViewModel, and
Model.
Callout
If you donpixi run app --server.
Pushing the Updated Tool to NDIP
Now that we have updated our Fractal tool and integrated it into the NOVA application using the MVVM pattern, the next step is to push these changes to NDIP. This step ensures that the tool on NDIP reflects the latest version of the tool and is available for others.
Here are the steps to push your changes and deploy the tool:
-
Bump the version: Open the
pyproject.tomlfile in the root of your project. Increment theversionnumber to0.2.0in the[project]section. Save the file. -
Stage your changes: Use
git add .to stage all changes that have been made to the application. -
Commit your changes: Create a commit with a
descriptive message:
git commit -m "Update Fractal tool with MVVM, bump to version 0.2.0". -
Push to the repository: Push your committed changes
to the remote repository with
git push. - Wait for CI/CD: The push will trigger a CI/CD pipeline in gitlab. Wait for the pipeline to complete which includes building the container image for your tool. You can monitor the pipeline status in the Gitlab interface.
-
Deploy the tool: Once the pipeline is successful,
run the deployment command from your project
s root directory: pixi run deploy-prototype.
This process ensures that your updated tool is built, containerized, and made available through NDIP.
Challenge
Trigger Pydantic Validation Error (Programmatic)
- In
Fractalinsrc/nova_tutorial/app/models/fractal.py, modify theset_fractal_typefunction from the previous exercise to use an invalid fractal type:
PYTHON
    def set_fractal_type(self, fractal_type: str):
        self.fractal_type = "bad_type" # Use the setter which includes validation

        print("Attempted to set fractal type programmatically to:", new_type)
        print("Current fractal type (after attempt):", self._fractal_type) # Print value after attempt
print("Current message:", self._message) # Print message- Run the application (
pixi run app). Observe the console output. Verify that: - The message
Attempted to set fractal type programmatically to: invalid-fractal-type is printed. - The
Current fractal type (after attempt): is still mandelbrot indicating the invalid update was rejected. - The
Current message: now contains a Validation Error message from Pydantic.
Challenge
Inspect ViewModel State
- In
src/nova_tutorial/app/view_models/main_view_model.py, addprintstatements within theMainViewModel.__init__method to print the initial values ofself.fractal,self.fractal.galaxy_url, andself.fractal.fractal_type. - Run the application (
pixi run app). Observe the output in the console. Verify that the initial values are printed as expected. - Now, modify the
MainViewModel.__init__method to change the initial value ofself.fractal.fractal_typetojulia . Run the application again and confirm that the printed message has changed.
References
- Nova Documentation: https://nova-application-development.readthedocs.io/en/latest/
- nova-galaxy documentation: https://nova-application-development.readthedocs.io/projects/nova-galaxy/en/latest/
- nova-trame documentation: https://nova-application-development.readthedocs.io/projects/nova-trame/en/stable/
- nova-mvvm documentation: https://nova-application-development.readthedocs.io/projects/mvvm-lib/en/latest/
- NDIP documentation: https://ndip-test.ornl.gov/docs/
Key Points
- MVVM stands for Model, View, View-Model.
- MVVM is a design pattern which provides best practices for UI development.
- MVVM helps developers create maintainable, testable, and reusable code.
- The foundation of MVVM is a separation of logic between the UI (view), and the business logic (model) of the application.
- The View-Model component serves as an intermediary between the Model and the View.
- Pydantic is frequently used to validate inputs into our models.
- Bindings are used to synchronize data between the view and view-model.